Use Cases

Key Takeaways
VR breaks the standard input assumptions. There is no keyboard. The mouse does not exist. Push-to-talk buttons interrupt immersion. If your AI NPC requires the player to hold a button to speak, the experience immediately feels like a tool rather than a world.
This tutorial fixes that. Starting from a simple Unreal Engine VR template project with a Convai-integrated MetaHuman already set up, we walk through four additions: a floating 3D chat widget, hands-free voice input, Convai Actions, and scene object registration. By the end your AI NPC follows you, points at objects, and holds a natural conversation entirely through voice.
Watch the full VR tutorial for Unreal Engine here:
This tutorial assumes you already have:
The Convai plugin is available on the FAB Store. Android build and packaging steps are not covered in this tutorial as they vary by Unreal Engine version. Refer to the Unreal Engine documentation for those details.
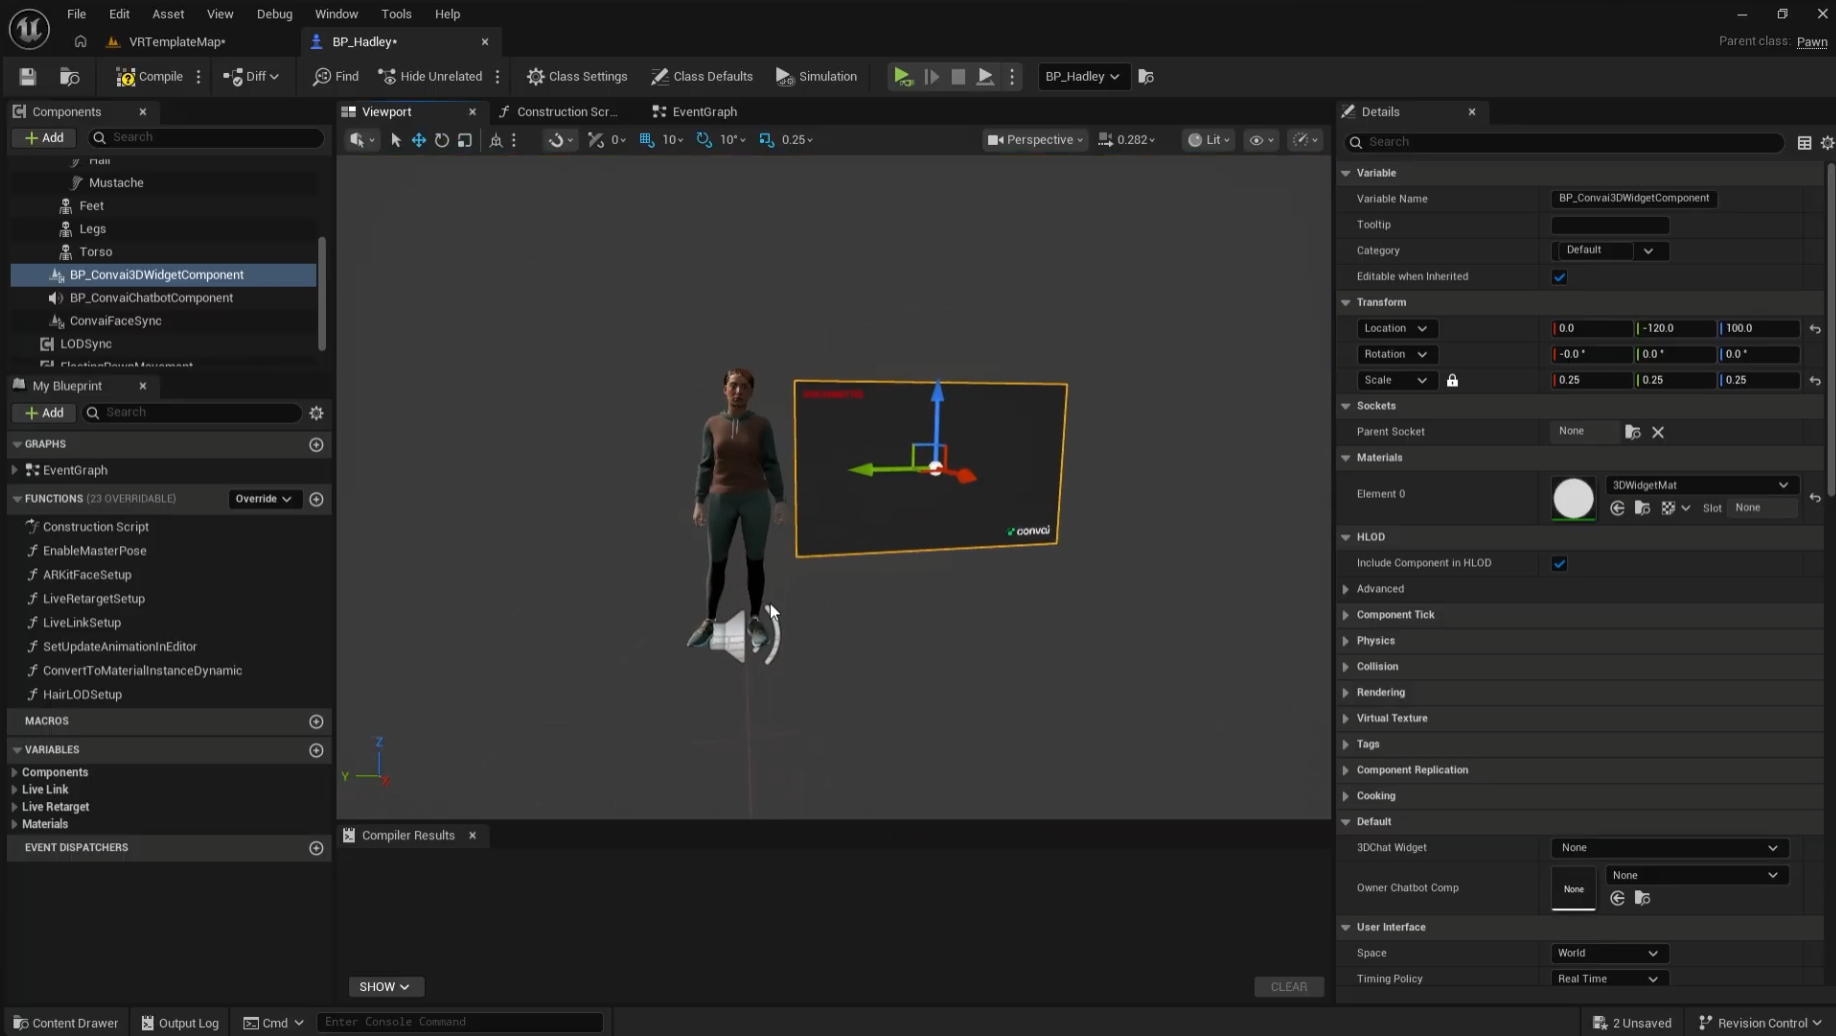
In a flat-screen project, the Convai chat UI sits on the HUD. In VR there is no HUD and everything needs to exist in world space. The BP Convai 3D Widget Component handles this by attaching a floating chat transcript directly to your character.
Here are the steps:
The widget follows the character wherever they move and displays the live transcript of the conversation in real time. Players looking at the character can read what is being said alongside hearing it, which is especially useful in noisy environments or for accessibility.
Also read: Real-Time AI Conversations and Facial Animation for MetaHumans in Unreal Engine with Convai

Push-to-talk is the right default for desktop and mobile deployments where accidental input is common. In VR it breaks immersion as players are holding controllers, physically moving, and cannot comfortably hold a button while having a conversation.
Disabling it takes one step:
With push-to-talk disabled, the Convai character listens continuously. The player speaks naturally and the NPC responds without any button input. In the demo, Alice the AI character responds immediately to spoken questions about herself, picks up on follow-up questions, and maintains context across the conversation; all without the player touching a controller button.
This is the same Voice Activity Detection capability that powers hands-free interaction in the Unity SDK: it detects when the player starts and stops speaking automatically.
Do Check Out: From Dialogue to Action: Create Scene-Aware AI Characters That Act AND React | Convai Unreal Engine

Actions are what turn a conversational AI NPC into a spatially present character. Without Actions, the character responds with dialogue. With Actions enabled, the character physically responds to what the player says: following them, pointing at objects, navigating to locations
This is the Prompt-to-Action (P2A) system: a player prompt maps directly to a physical behavior the engine executes. In VR this is especially compelling because the player and the character are in the same spatial context.
To enable Actions:
The character will now have access to default actions including Follow, Move To, Stop Moving, and Wait For. These work immediately without any Blueprint scripting. See the Convai Actions documentation or watch the tutorial for the full list and configuration options.
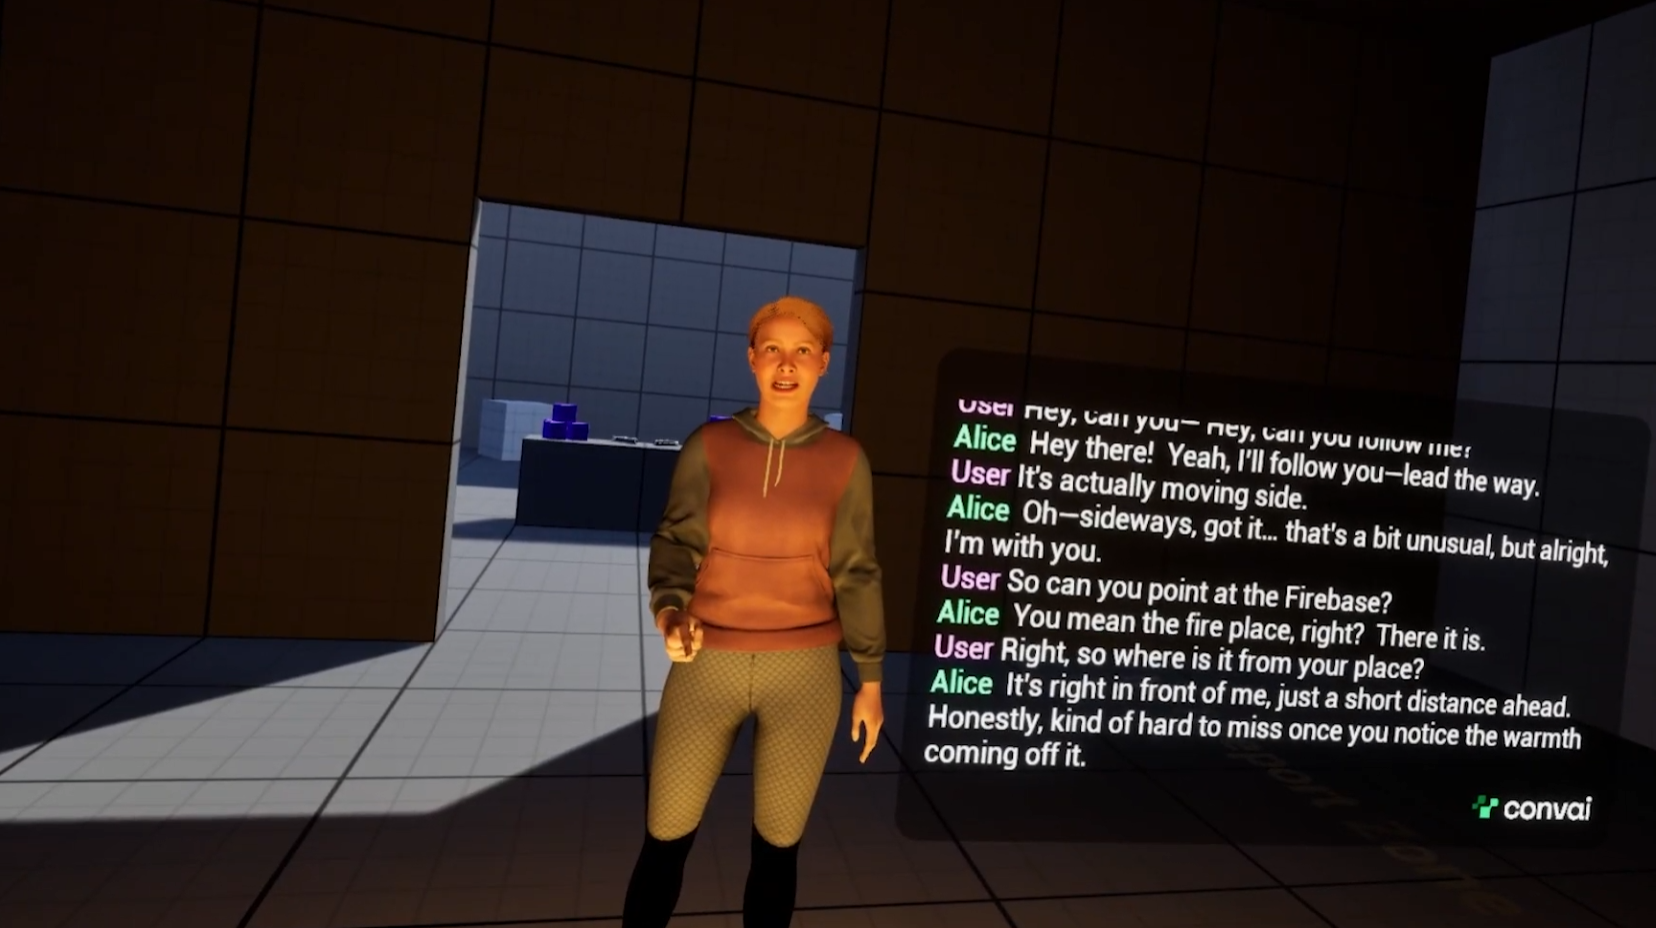
In the demo, asking "Hey, can you follow me?" causes Alice to immediately start walking alongside the player. The character responds verbally -- "Yeah, I'll follow you, lead the way", and simultaneously begins the navigation. Dialogue and action happen together, not sequentially.
Enabling Actions gives the character movement behaviors. Registering scene objects gives it spatial awareness ie. the ability to navigate to, point at, and discuss specific props in the environment.
The setup is straightforward:
In the demo, the fireplace is registered as an object. When the player asks "Can you point at the fireplace?" the character physically turns toward it and points, responding conversationally: "There it is, right in front of me, just a short distance ahead." The character knows both where the fireplace is spatially and can describe it verbally because the same context drives both the action and the dialogue.
Object names should be clear and distinct. If two objects have similar names the LLM may select the wrong one. Use Mindview to inspect exactly which objects were registered in the context the LLM received on any given turn which is useful for debugging if the character points at the wrong thing.
Also read: How to Use Dynamic Context in Convai to Build AI Characters That React in Real Time
With all four additions in place, here is what the experience delivers:
According to the 2024 State of the Game Industry report by the Game Developers Conference, 47% of studios are actively exploring AI-driven NPC dialogue and action systems. VR is where this becomes most impactful with spatial presence and natural voice interaction together creating the conditions where players genuinely forget they are talking to an AI.
This tutorial covered default Actions which includes the navigation and movement behaviors that require no Blueprint scripting. The Convai Actions series goes further:
The Convai Actions documentation covers all three phases. The Convai plugin on FAB is the install source for the Unreal Engine integration.

Sign up at convai.com to create AI characters and deploy them across VR, XR, games, simulations, and training applications. For technical questions, the Convai Developer Forum is the fastest way to get support from the team and the community.
Don't forget to subscribe to our YouTube channel for more deep dives into browser-based AI and digital human technology!
Open your Player Blueprint, navigate to the BP Player component, find Push to Talk in the Details panel, and disable it. The Convai character will then listen continuously without the player needing to hold a button.
Select your character, click Edit Blueprint, and under Components search for BP Convai 3D Widget Component and add it. Scale and position it relative to the character. The widget follows the character in world space and displays the live conversation transcript.
Select your character, open the Convai Chatbot Component in the Details panel, and check Enable Actions under the Actions category. This unlocks default behaviors including Follow, Move To, and Stop Moving. See the full Convai Actions documentation for setup details.
In the Convai Chatbot Component Details panel under Actions, click + next to Object, use the Picker to select the scene actor, and give it a name. The character can then navigate to, point at, and reference that object conversationally. Use Mindview to verify the object appeared in the LLM context.
No. Android build and packaging steps vary depending on the Unreal Engine version and are not covered in this tutorial. Refer to the Unreal Engine documentation for build and packaging details specific to your version.


